Octokit を使って GitHub API を叩く際に、認証方法を Personal Access Token から GitHub Apps に切り替えました。
Personal Access Token で行う方法と、 GitHub Apps で行う方法をそれぞれをメモしておきます。
環境
- Node.js 16.15.0
- @octokit/core 3.5.1 (Personal Access Token)
-> @octokit/app 13.1.2 (GitHub Apps) への移行 - 叩きたい API は GitHub REST API と GraphQL API
Personal Access Token を使って GitHub API を叩く
Personal Access Token の準備
- Settings -> Developer settings -> Personal access tokens にアクセス。
- Generete new token から、トークン作成ページを開く。
- 適切な Permissions などを設定し Personal Access Token を作成。
今回は GitHub API を通して public リポジトリへの 書き込みを行いたいので、public_repo (Access public repositories) にチェックを入れておく。
プライベートリポジトリにも書き込みたい場合は、repo ごと選択しておく。
これらは後からでも編集できる。 - 作成したトークンをメモしておく。
例:ghp_Vde...
GitHub API を叩くソース
メモしておいたトークンを使って Octokit インスタンスを作成し、GitHub API を叩きます。
const { Octokit } = require('@octokit/core');

// Octokit インスタンスの作成
const octokit = new Octokit({ auth: 'ghp_Vde...' });

// GitHub API の使用
const responseRest = await octokit.request(...略...);
const responseGraphql = await octokit.graphql(...略...);
Octokit を使って Personal Access Token で GitHub API を叩いているソースの例はこちら。
GitHub Apps を使って GitHub API を叩く
GitHub App の作成と認証に必要な情報の準備
まず、GitHub App を作成します。
Organization で作成する方法と、個人アカウントで作成する方法がありますが、今回は個人開発に使うので後者で作成します。
- Settings -> Developer settings -> GitHub Apps にアクセス。
- New GitHub App から GitHub App 作成ページを開く。
- 必要な項目を入力して GitHub App の作成。
今回はリポジトリへの書き込みを行いたいので Repository permissions -> Contents に Read and write 権限をつけておく。
他の項目は一旦適当でも OK。後からでも編集できる。
作成した GitHub App をリポジトリへインストールします。
- Settings -> Developer settings -> GitHub Apps -> アプリ名 から、作成した GitHub App を選択。
- 左サイドバーの Install App から、GitHub API で書き込む対象のリポジトリに GitHub App をインストール。
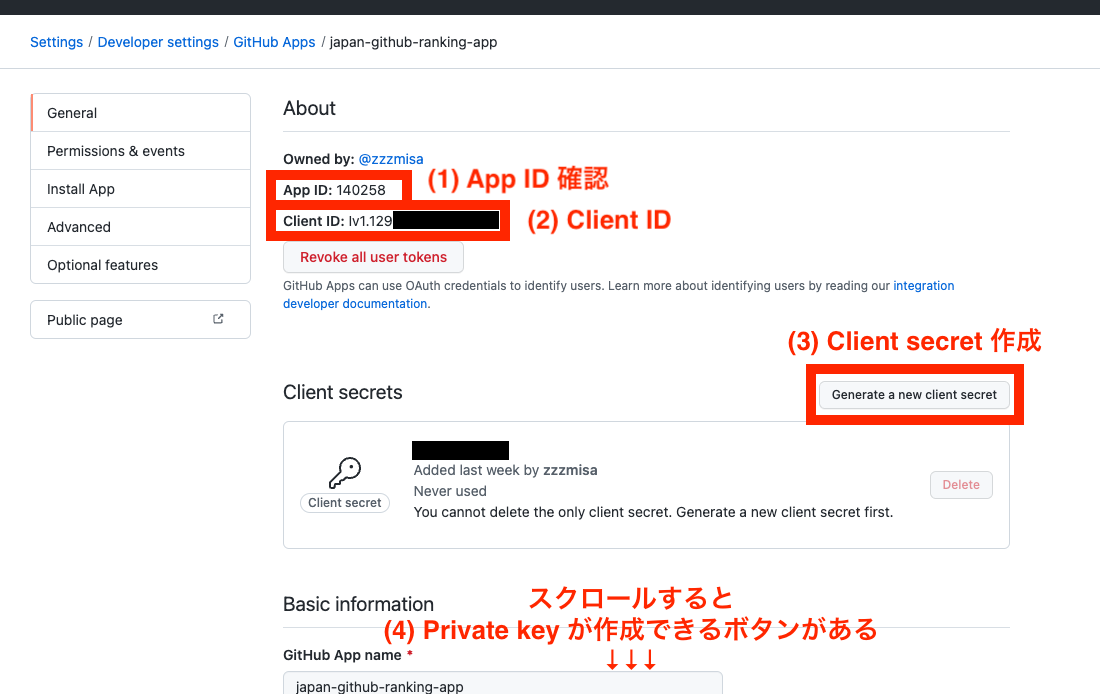
認証に必要な情報を確認してメモします。
- Settings -> Developer settings -> GitHub Apps -> アプリ名 を開く。
(1) App ID, (2) Client ID を確認、(3) Client secret を作成してメモしておく。
(4) Private key は、作成すると pem ファイルとしてダウンロードされる。 - Settings -> Applications -> Installed GitHub Apps -> 該当アプリの Configure を開く。 URL の末尾の数字が (5) Installation ID なのでメモしておく。

GitHub API を叩くソース
メモしておいた値 を使って Octokit インスタンスを作成し、GitHub API を叩きます。
ただし、Private key の pem ファイルは、API に渡すことができる 1 行形式に変換しておく必要があります。
# このままだとAPIに渡せない
% cat japan-github-ranking-app.2023-01-28.private-key.pem
-----BEGIN RSA PRIVATE KEY-----
MI...略...
-----END RSA PRIVATE KEY-----

# 1 行形式に変換しておく
% awk 'NF {sub(/\r/, ""); printf "%s\\n",$0;}' japan-github-ranking-app.2023-01-28.private-key.pem
-----BEGIN RSA PRIVATE KEY-----\nMI...略...-----END RSA PRIVATE KEY-----\n
改めて、(1)〜(3) 、1 行形式に直した(4)、(5) の値を使って GitHub API を叩きます。
const { App } = require('@octokit/app');

const setGithubApp = async (octokitInfo) => {
  const app = new App({
    appId: '140258',
    privateKey: '-----BEGIN RSA PRIVATE KEY-----\nMI...略...-----END RSA PRIVATE KEY-----\n',
    oauth: {
      clientId: 'Iv1.129...',
      clientSecret: '...',
    },
  });

  const installationOctokit = await app.getInstallationOctokit('33617850');
  return installationOctokit;
};

// Octokit インスタンスの作成
const octokit = await setGithubApp(params.octokitInfo);

// GitHub API の使用
const responseRest = await octokit.request(...略...);
const responseGraphql = await octokit.graphql(...略...);
Octokit を使って Personal Access Token で GitHub API を叩いているソースの例はこちら。
GitHub Apps を使う理由
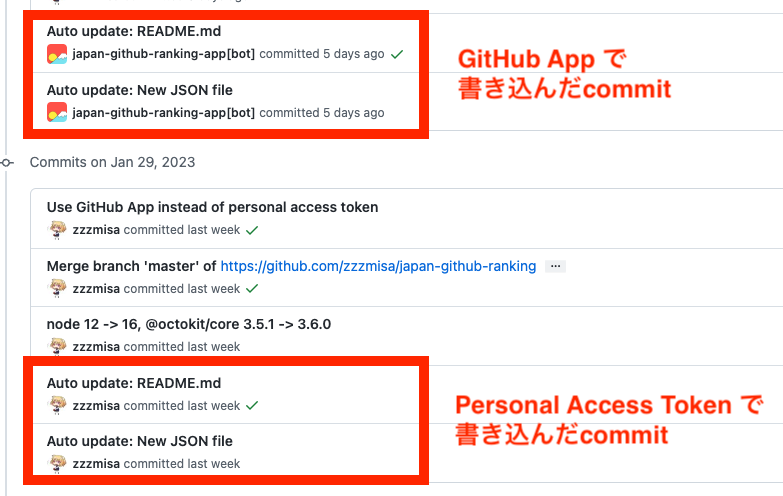
GitHub 日本語ランキングでは、 毎日 1 回ランキング結果をリポジトリに書き込むよう FaaS でスケジューリングしています。
これを Personal Access Token を使って行うと、自分が commit したことになってしまいます。
本当は手を動かしていないにもかかわらず、Contribution にカウントされ、プロフィールに草が生えてしまっていました。
これが気持ち悪かったので、今回 GitHub App を使って書き込むよう変更しました。
GitHub App で commit することにより、自分の Contribution にはカウントされないようになりました。
まとめ
Personal Access Token でも GitHub Apps でも、Octokit インスタンスを作れたら、GitHub API の叩き方は一緒。